Taking files in and out of the SRCP
Overview
The SRCP platform enforces strict controls and full auditing of all files moved in and out to:
Protect participant confidentiality
Prevent unauthorised data removal
Prevent unauthorised or unsafe files entering the system
Users cannot access their project folders directly from outside the SRCP. All file transfers must go through a controlled triage process handled by a Data Manager. All analysis must be conducted within the SRCP. Only summary-level (aggregate) results may be taken out. Individual-level data can never be removed under any circumstances. To strengthen these measures further, user should take out the minimum data necessary for research (e.g. writing up final results).
Files are moved in and out of the SRCP using SFTP (SSH File Transfer Protocol) and requires an SFTP client to be set up on your local computer - see below.
Taking Files Off the SRCP
Requirements for files to be taken out
Before any file is released from the SRCP, a Data Manager will review it to ensure it meets the Disclosure Control Rules.
Files to be taken out must:
Contain summary (aggregate) results only
Contain no individual-level data
Contain no participant or sample IDs
Have clear labels/descriptions for all results
Mask small counts (any count < 10 must be suppressed or masked) and prevent small counts from being derived
Be limited to final results wherever possible (avoid exporting large numbers of intermediate files)
Information required for files to be taken out
When requesting files to be taken out, you must provide:
The file name and location (note files in your home folder are not accessible by Data Managers)
A description of what the file(s) contain(s) and how the disclosure rules are met
How it was generated and if appropriate the code/environment required to load the file
Why it is relevant to your research question
How to request files to be taken out
This information can be provided when opening a new request here
A note on machine learning models
While developing machine learning (ML) models offers significant opportunities, removing trained models from the SRCP poses disclosure risks that are not yet fully addressed by existing guidance. Unlike conventional statistical outputs, ML models are a relatively new research output with less well-understood potential to reveal individual-level information, and there is limited consensus on how to assess and mitigate these risks once models leave the SRCP. As best practice continues to evolve, our interim policy is to generally prohibit removing trained ML models from the SRCP unless there is compelling evidence that they do not present disclosure risk. Model performance metrics and hyperparameters may be released subject to standard output checking.
Taking Files Into the SRCP
Requirements for files to be taken in
All files taken into the SRCP are reviewed before being moved into your project folder. This ensures:
Participant data remains protected
Research policy compliance
No malicious software is introduced
Information required for files to be taken in
For data files to be approved, explain how the following requirements are met:
The data must be relevant to your research
The data must be approved for use in your research question (if not publicly available)
If a particular software environment is needed to open the file, this must be provided
For code to be approved, explain how the following requirements are met:
The code must be relevant to your research
The source must be reputable
It must not contain malware
How to request files to be taken in
This information can be provided when opening a new request here
The SRCP Triage System
Each user is assigned a personal triage area, accessible externally via SFTP.
There are two folders:
Upload folder – for approved files entering the SRCP
Download folder – for approved files leaving the SRCP
Important:
You cannot move files directly between your triage area and your project folder.
Only a Data Manager can transfer files between these areas.
You must notify a Data Manager when files are ready for review.
Once approved, files are transferred and immediately available.
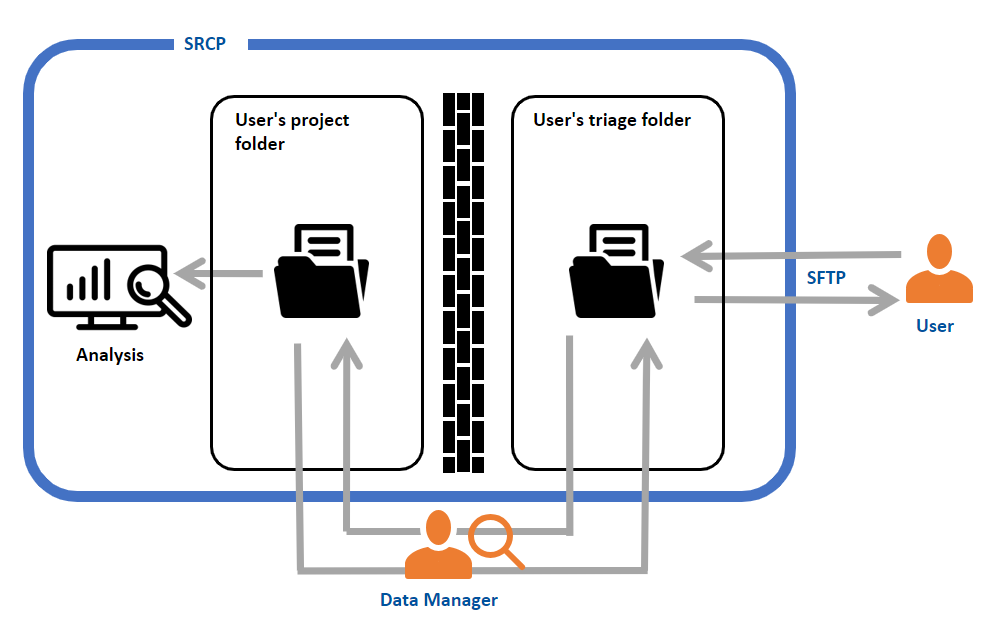
Summary of process for downloading (taking out) files
A user wishes to take out some files from the SRCP
They notify a Data Manager with the Information required for files to be taken out
The Data Manager inspects the file(s) and confirms that it meets the requirements
The Data Manager copies the file from the user’s project folder to their “download” triage folder and notifies the user
The user connects to their “download” triage folder using SFTP and downloads the file
Summary of process for uploading (bringing in) files
A user wishes to bring some files into the SRCP
The user connects to their “upload” triage folder using SFTP and uploads the file
They notify a Data Manager with the Information required for files to be taken in
The Data Manager inspects the file and confirms that it meets the requirements
The Data Manager copies the file from the user’s “upload” triage folder to the user’s project folder and notifies the user
The user uses the file that is now available in their project folder
Connecting to epi-analysis SRCP with SFTP
The address of the epi-analysis SFTP site is data-epi-analysis.srcp.hpc.cam.ac.uk.
The username, password and 2 factor authentication device are the same as those used to log into the web interface. A connection to the Cambridge VPN is required.
SFTP Clients
To connect, an SFTP client is required such as:
When setting up the Client, check that the host key matches one of these keys:
SHA256:j1/yov0yGMla50k3KsPiSK7fVFcjAul7goglZXG7s1o (ECDSA)
SHA256:rLA8ooUEnrbUBL7fPolOH6D2akF9PqZXp3EtWnhGWxI (ED25519)
SHA256:Veb3XsMSZom7dng3FHUNvbMr6wBMcfCcZ//6pTmsWgk (RSA)
If your client ever warns that the host key has changed, and it does not match one of these keys then do not proceed and contact srcpdata@mrc-epid.cam.ac.uk
Example of setting up WinSCP
Connect to the Cambridge VPN (or use a computer that is connected to the Cambridge Network)
Start WinSCP where you will be presented with the Login dialogue
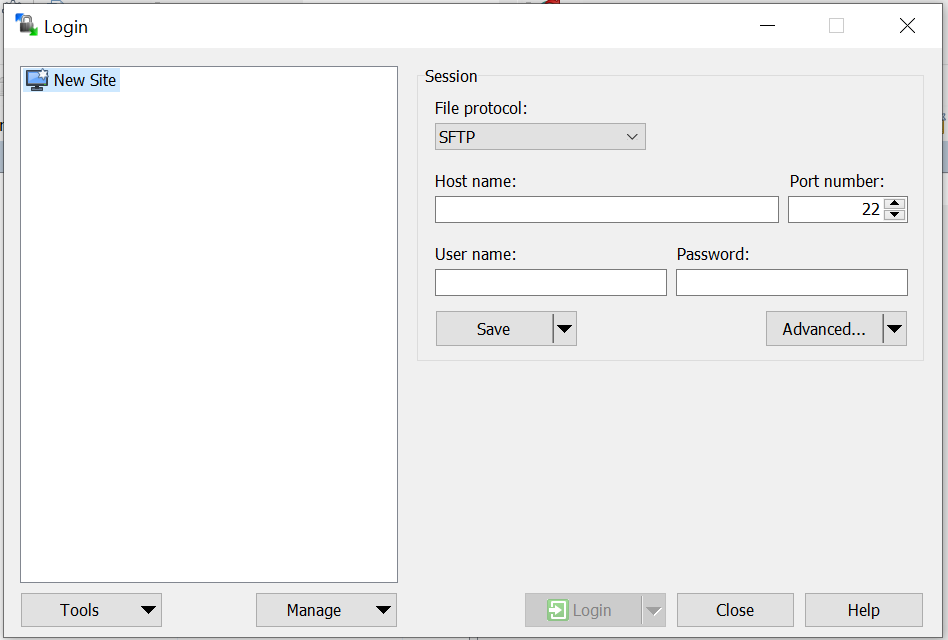
Choose SFTP as the protocol, enter the hostname as data-epi-analysis.srcp.hpc.cam.ac.uk, set the port to 22 and enter your CRSid as the username (i.e. the same username you use to log into the SRCP web interface).
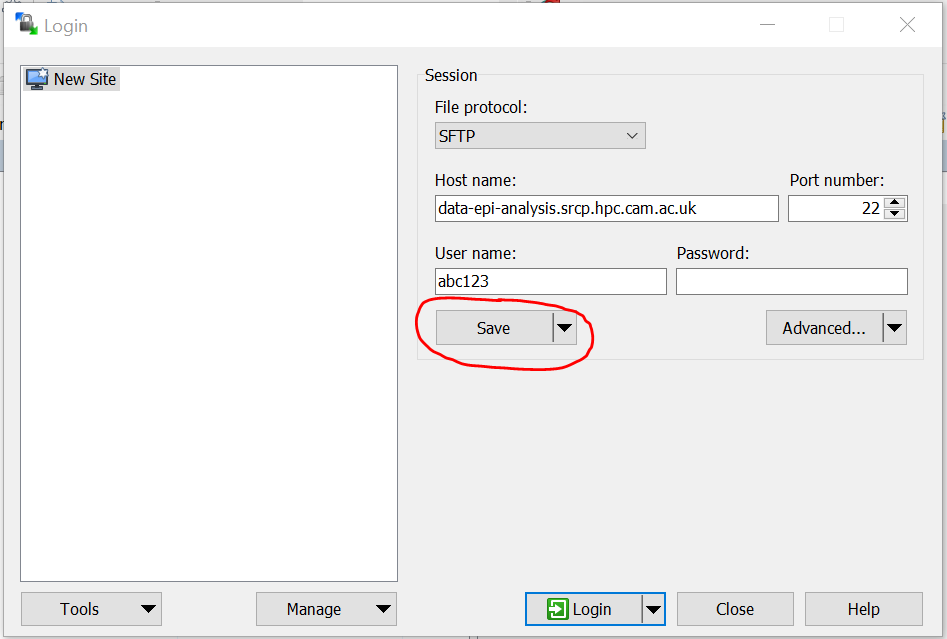
Click Save and then click OK to save the session as a site. This will allow you to reconnected more easily in the future.
You will see a warning about the server key not being found in the cache. Check that the key matches one of these keys:
SHA256:j1/yov0yGMla50k3KsPiSK7fVFcjAul7goglZXG7s1o (ECDSA)
SHA256:rLA8ooUEnrbUBL7fPolOH6D2akF9PqZXp3EtWnhGWxI (ED25519)
SHA256:Veb3XsMSZom7dng3FHUNvbMr6wBMcfCcZ//6pTmsWgk (RSA)
If it is not one of these keys, then click Cancel and contact srcpdata@mrc-epid.cam.ac.uk
Example of uploading (bringing in) files using WinSCP
Connect to the Cambridge VPN (or use a computer that is connected to the Cambridge Network)
Start WinSCP where you will be presented with the Login dialogue. Select the session for the SRCP that you saved previously
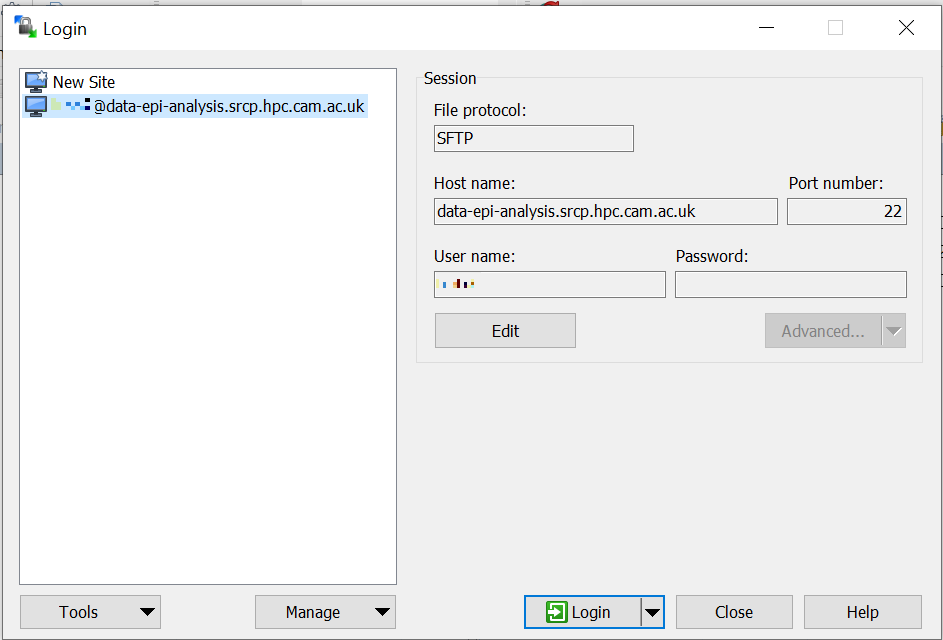
Click the Login button.
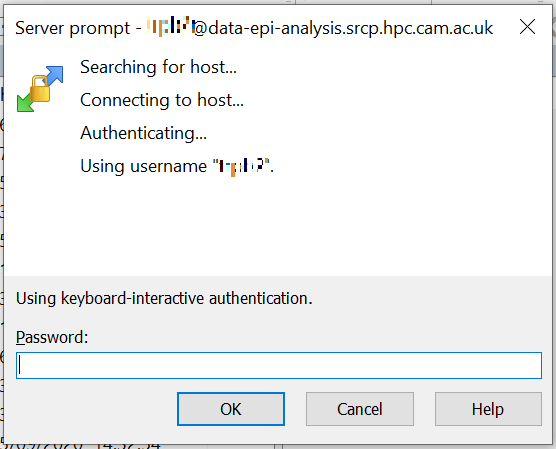
Enter your CRS/Raven password (the same as for the SRCP web interface) and then enter a TOTP from your mobile device for 2 factor authentication (the same as for the SRCP web interface)
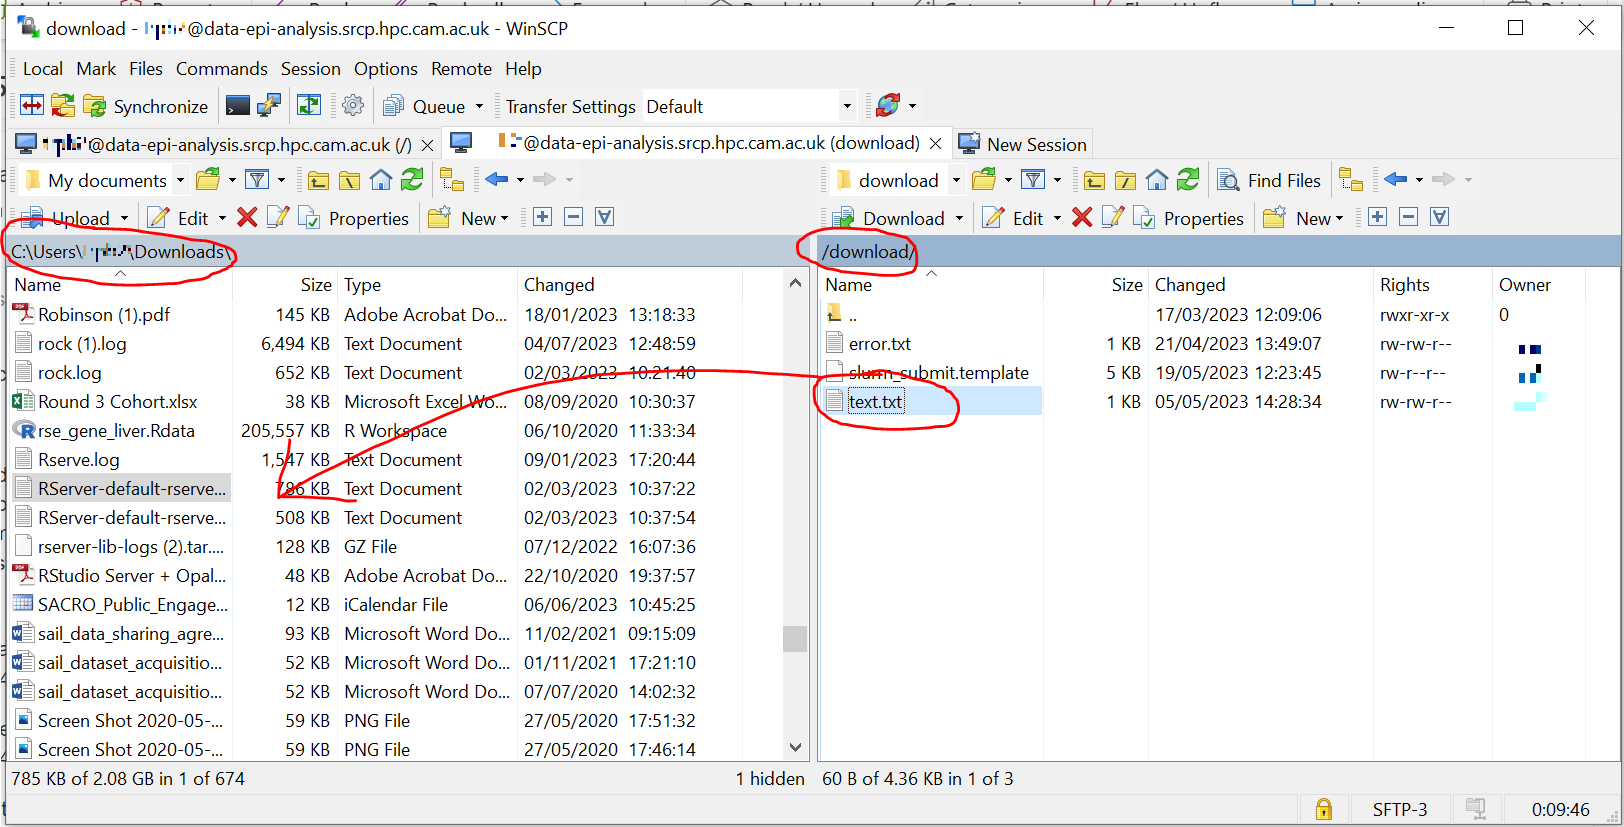
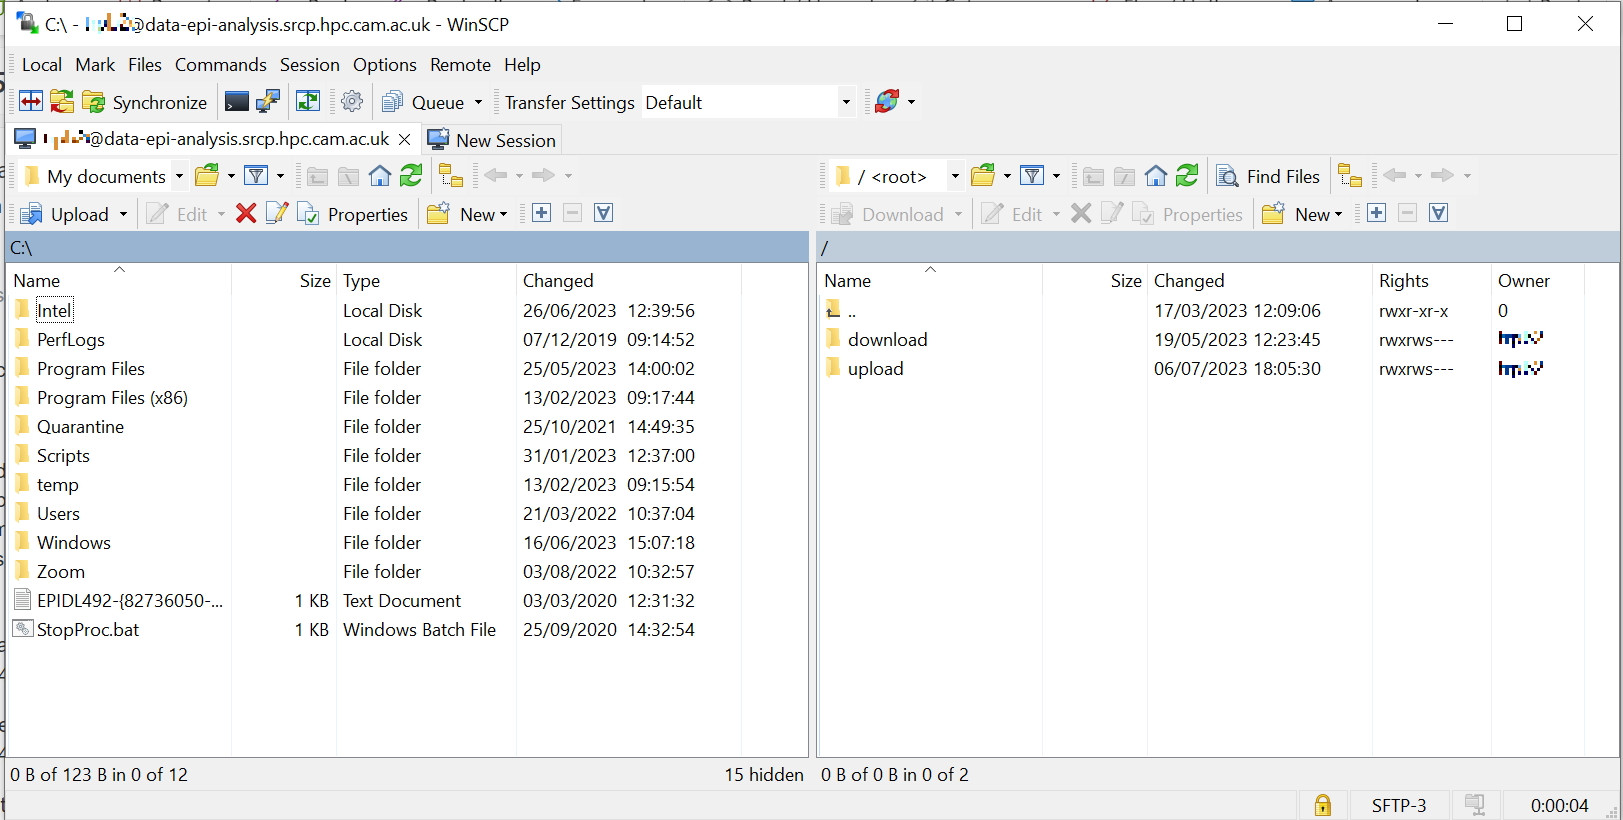
You should now be connected. The triage upload and download folders on the SRCP are shown on the right, and your local machine’s folders on the left. You can transfer files between these locations.
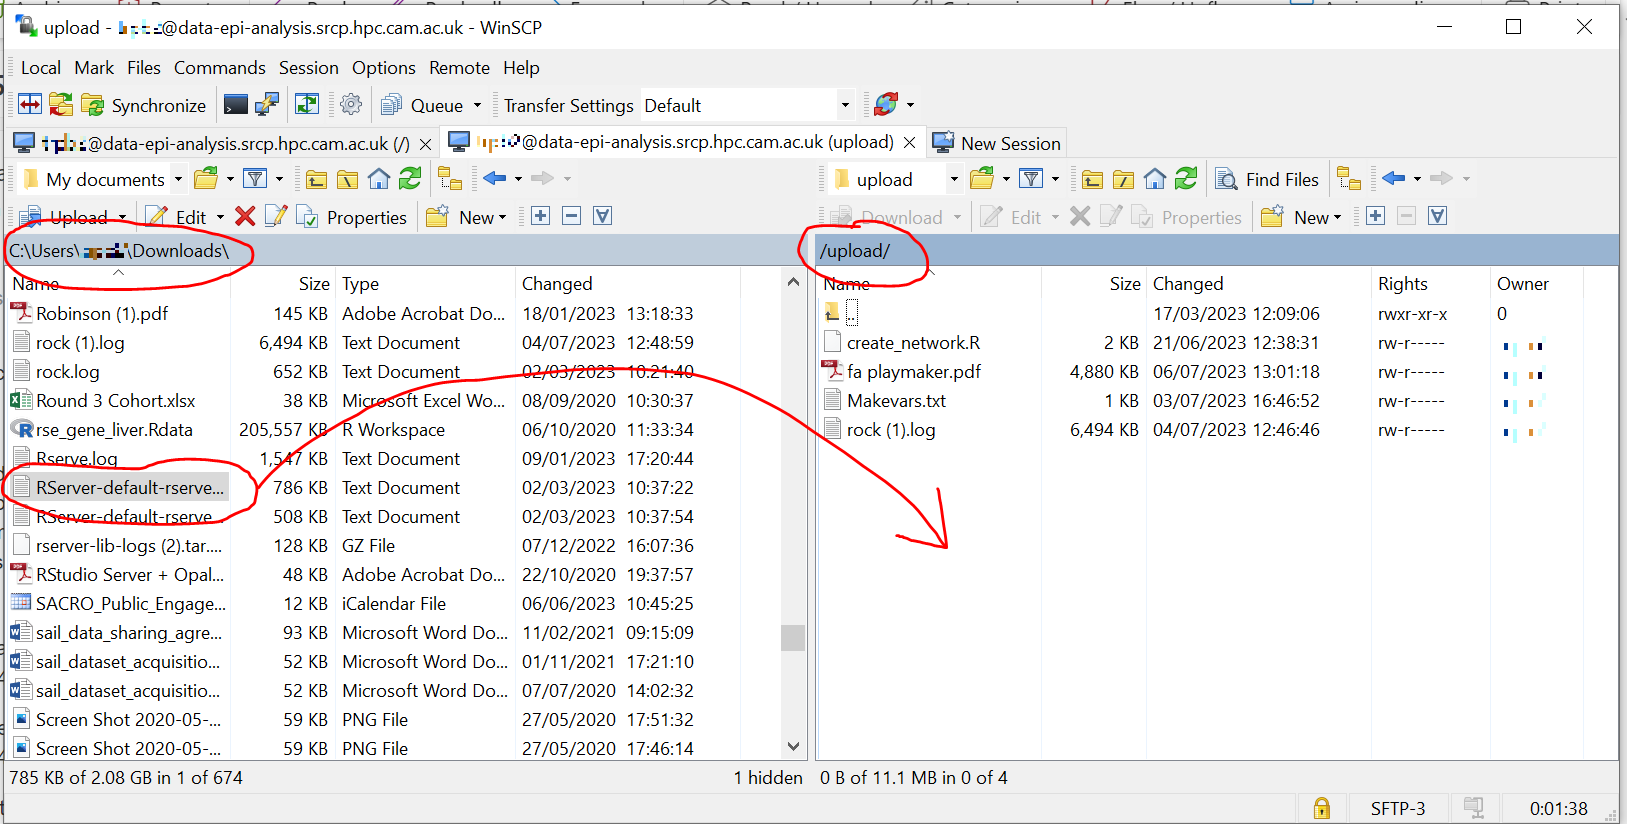
Locate the file on your local machine (left side) that you wish to upload. Drag and drop it into the upload folder on the SRCP (right side)
They notify a Data Manager with the Information required for files to be taken in
Example of downloading (taking out) files using WinSCP
They notify a Data Manager ` with the Information required for files to be taken out
When you have received notification from the Data Manager that the files are ready for you to download, connect to the Cambridge VPN.
Start WinSCP where you will be presented with the Login dialogue. Select the session for the SRCP that you saved previously
Click the Login button.
Enter your CRS/Raven password (the same as for the SRCP web interface) and then enter a TOTP from your mobile device for 2 factor authentication (the same as for the SRCP web interface)
You should now be connected. The triage upload and download folders on the SRCP are shown on the right, and your local machine’s folders on the left. You can transfer files between these locations.
Locate the file on the SRCP (right side) that you wish to download. Drag and drop it to the required folder on your local machine (left side)