Data management (internal IMS only)
This section is for IMS Data Managers, not for collaborators using the SRCP for their analyses.
Overview
Epidemiology Data Managers are responsible for the following tasks:
Project Setup: Creating new projects as needed in response to data requests. Each project includes a dedicated folder within
/srv/projectsand a resource account/partition specifying available computational resources.User Account Management: Setting up SRCP accounts for users.
Data Request Import: Importing study data into the SRCP as requested by users.
Folder and Permissions Management: Organising project folders and configuring appropriate permissions for study data.
Managing File Transfers: Moving files between users’ triage (“upload” and “download”) folders and their project folders, such as importing code or exporting results.
Data and Code Review: Reviewing all data and code entering or leaving the SRCP to ensure compliance and prevent unauthorised content.
Summary of set up process
The following diagram gives an overview of what needs to be done to get a user up and running on the SRCP.

Prerequisites
To perform the data management tasks, the Data Manager needs to:
Understand how to log into the SRCP
Be able to start a remote desktop session on SRCP - Data Managers should use the root account and managers partition
Set up an SFTP client
Setting up projects
To set up a project on the SRCP, the following information is needed:
The approved data request (e.g. for EPIC Norfolk this is the EPIC Norfolk Data Request Form) and associated reference number
Folder name in the format
year_month_initials_ENDRnumbere.g. 2024_10_TB_ENDR123_2024Hardware requirements for the core limit and storage for the project
Which node should the project be assigned to
Specifying the hardware needs some judgement. During the Visiting Worker process the user can specify any requirements for more resources such as additional cores for work with large genetic data sets. As standard we offer 3 cores per user and a total of 200GB of storage, and this can be changed later if required. Extra hardware has additional charges to cover our costs. The project is assigned to a particular node, which is a piece of hardware, with the objective of trying to keep a balanced allocation of projects across nodes. Current assignments can be seen with the following command:
$ sinfo -O Partition,MaxCPUsperNode,Nodelist --sort Nodelist
This code snippet is available in /srv/shared/scripts/slurm.txt (to save having to retype it - copy and paste is disabled). Alternatively these allocations are captured on the Hardware tab in the coreLimitProject column of this spreadsheet . Note that a core limit is the maxmimum that can be used by a project rather than per user. GPU nodes have to be set up on a case by case basis and are very expensive - the RCS team can supply more information. Storage is relatively cheap, around £115 per TB per year, so it is probably not necessary to charge extra unless whole Terrabytes are requested. The overall allocation is tracked on the same spreadsheet as above, under the Theoretical Max column. Again, most projects use well under their allocation so we don’t actually have enough storage to accommodate the theoretical maximum.
To request a new project, this form needs to be completed. The following responses are suggested for standard EPIC Norfolk projects but could be changed if needed:
Section 1 – SRCP Platform. Select “New project” and “vHPC”. For vHPC the platform id is b864dfnfpqj
Section 5 – Create a Project. The project name is will be the folder name, the suggested format is
year_month_initials_ENDRnumberwhere initials are for the person doing the research. The description can be taken from the ENDR form.Section 6 – Project Managers. Select “Yes”.
Section 7 – Software Requirements. Enter “N/A”.
Section 8 – vHPC Infrastructure Specification. Leave blank or enter “N/A”.
Section 10. Select “Yes”.
Section 11 – Data Compliance. Enter “N/A - uses data from the existing EPIC Norfolk study.”.
Section 12 – Data Provider Details. Enter “N/A” for all sections.
You should then receive a confirmation email titled SRCP Resource Request. Wait a few more minutes, and then you should get a new ticket from RCS support with a title like HPCSSUP-123456 SRCP Resource Request. Reply to this email with a copy of the data request form (required by Victoria Hollamby who is the Clinical School Research Governance Advisor).
Billing
We are charged for using the SRCP by RCS: 1. vHPC (Linux) - we are billed for the whole platform on March 16th each year. Projects can start at any time and are pro-rated in that first billing period. Once a project is >1 year in duration, we can then cancel it at any time and again pro rate it at the next billing date. 2. Windows - as we are not platform managers, each project is billed separately. They must still be >1 year duration.
Setting up the project folder
Before bringing in the data, it is recommended that some additional subfolders are created in the project folder (e.g. 2023_06_20_Smith_ENDR023_2020). The project folder can be written to by members of the platform-b864dfnfpqj-managers group, i.e. Data Managers, but users cannot write to this folder. The data should be stored in a read-only location so that it cannot be changed accidentally - the data subfolder. This can be created with the command $ mkdir data and will automatically have the correct read-only permissions for users. Any subfolders or files created in the data subfolder will also inherit the correct permissions. Users will also need a location to do their work and save results - the analysis subfolder. The suggested folder structure looks like this:
├── 2023_06_20_Smith_ENDR023_2020
│   ├── data
│   │   ├── files and subfolders in data folder
│   └── analysis
│       ├── files and subfolders in analysis folder
The user needs permission to read, write and execute in the analysis folder, which is not set up automatically. The best way to achieve this is with this command:
$ nfs4_setfacl -a "A:fdg:project-<project-id>-users@hpc.cam.ac.uk:RWX" /srv/projects/<userproject>/analysis
where <project-id> is the 11 character alphanumeric identifier (e.g. ck5gh6d3se) and <userproject> is the folder name (e.g. 2023_06_20_Smith_ENDR023_2020). You can find a template for these permission commands in this location: /srv/shared/scripts/permission_setup.txt. Display it on the screen using $ cat /srv/shared/scripts/permission_setup.txt. Once these permissions are set, subfolders and files created in the analysis subfolder will inherit the read, write and execute permissions.
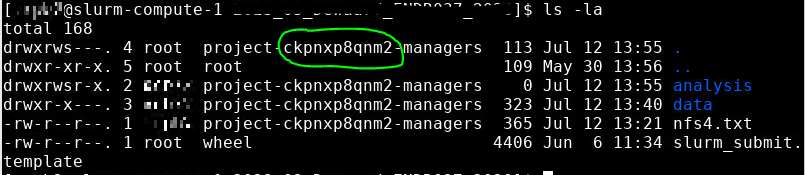
Note
If you list the project folder contents ($ ls -l) the <project-id> is available for copying and pasting - see the image below:
To check that the permissions have been set correctly, use the following command:
$ nfs4_getfacl /srv/projects/<userproject>/analysis
and the top (most recent) line should look like this:
A:fdg:project-<project-id>-users@hpc.cam.ac.uk:rwaDdxtTnNcCoy
Setting up users
Before a user can be set up, their project has to be set up first as the project details are needed for the application form. To set up a user on the SRCP:
The user completes a request form which gets sent to the RCS support team
The RCS support team send an email to the Epidemiology Platform Managers asking for the account to be approved
The Epidemiology Platform Managers check the request and approve or deny as appropriate
The RCS team create the account and send the details to the account owner and Epidemiology Platform Managers
Since most users do not check their @cam.ac.uk email account, a follow up email with an offer of extra support is needed
The first email that needs to be sent directs the user to fill in the request form, and can be found in the Email Templates section below. When the user has completed this, the Epidemiology Platform Managers receive an email describing the request. The following things need to be checked before approving:
The name and CRSid should match the project id and data request number to make sure the user is being given access to the correct project and data. This can be checked in the spreadsheet in the Users tab.
The requested role should be Project User, so that the correct permissions are given. For example, the user cannot move files out of the triage area.
If these items match up, then the request can be approved. The RCS team will then set up the account and notification will be given that it has been set up. When this has been received, the second email in the Email Templates section below can be sent.
Resource utilisation
The SRCP is made up of nodes. The CPU nodes we use have 26 cores available, and we currently have 2 nodes (compute-0 and compute-1). GPU nodes have 24 CPU cores and 1 A100 GPU, and are more expensive. Nodes are paid for on a pro-rated annual basis, and we are not operating a hourly charge model like CSD3. When a project is set up we set a limit on the maximum number of cores that can be requested by each user in that project (note that this is also per node, so if there are 2 nodes, the user has that limit per project per node). For a single user it might be appropriate to set a limit of 3 cores, for example. The limit depends on the project requirements and additional costs can be passed on to the user. RCS support can change the core limits on a queue. The nodes are over allocated in that the sum of the core limits of projects assigned to a node are greater than 26. This is because current experience suggests that it is unlikely that all users will be requesting their maximum at once. Finding the appropriate level of over allocation is more of an art than science, and is work in progress! If the full allocation of cores for a project is already in use (for example if there are 2 users using a queue with a 3 core limit and one user is using both cores) then a request to start a remote desktop session will be queued until a core becomes available. Alternatively, the project core limit may not be reached but all the cores on a nodes might be in uses. Again, the request will be queued until a core is available.
Account and partition for Data Managers
Data Managers can use a specific queue to avoid blocking users by specifying the root account and managers partition. For simple tasks like bringing data in or out you will only need 1 core. Some data checking could be more resource intensive and require more cores. If the session does not start immediately then we can request to increase the core limit.
The queueing system is provided by SLURM, and the following commands may be useful. They can be found in /srv/shared/scripts/slurm.txt
#Command to show jobs by user, showing which queue, node and how manys cpus they are using
$ squeue -o "%.7i %.9P %.8j %.8u %.2t %.10M %N %C"

#Information about the nodes - how many CPUs are available and how many are being used
$ sinfo -o "%n %e %m %a %c %C"

#Show total usage by user
$ sreport user top start=2023-01-01
Bringing study data into the SRCP
As summary of the process for bringing study data into the SRCP is:
Set up the SFTP connection to the SRCP
Navigate to the “upload” triage folder and upload the files
Log in to the SRCP web interface
Start a remote desktop session
Copy (not move) the files from your “upload” triage folder to the required project folder
Confirm that an analysis folder has been set up and permissions are set correctly in the project
Notify the user
Tidy up
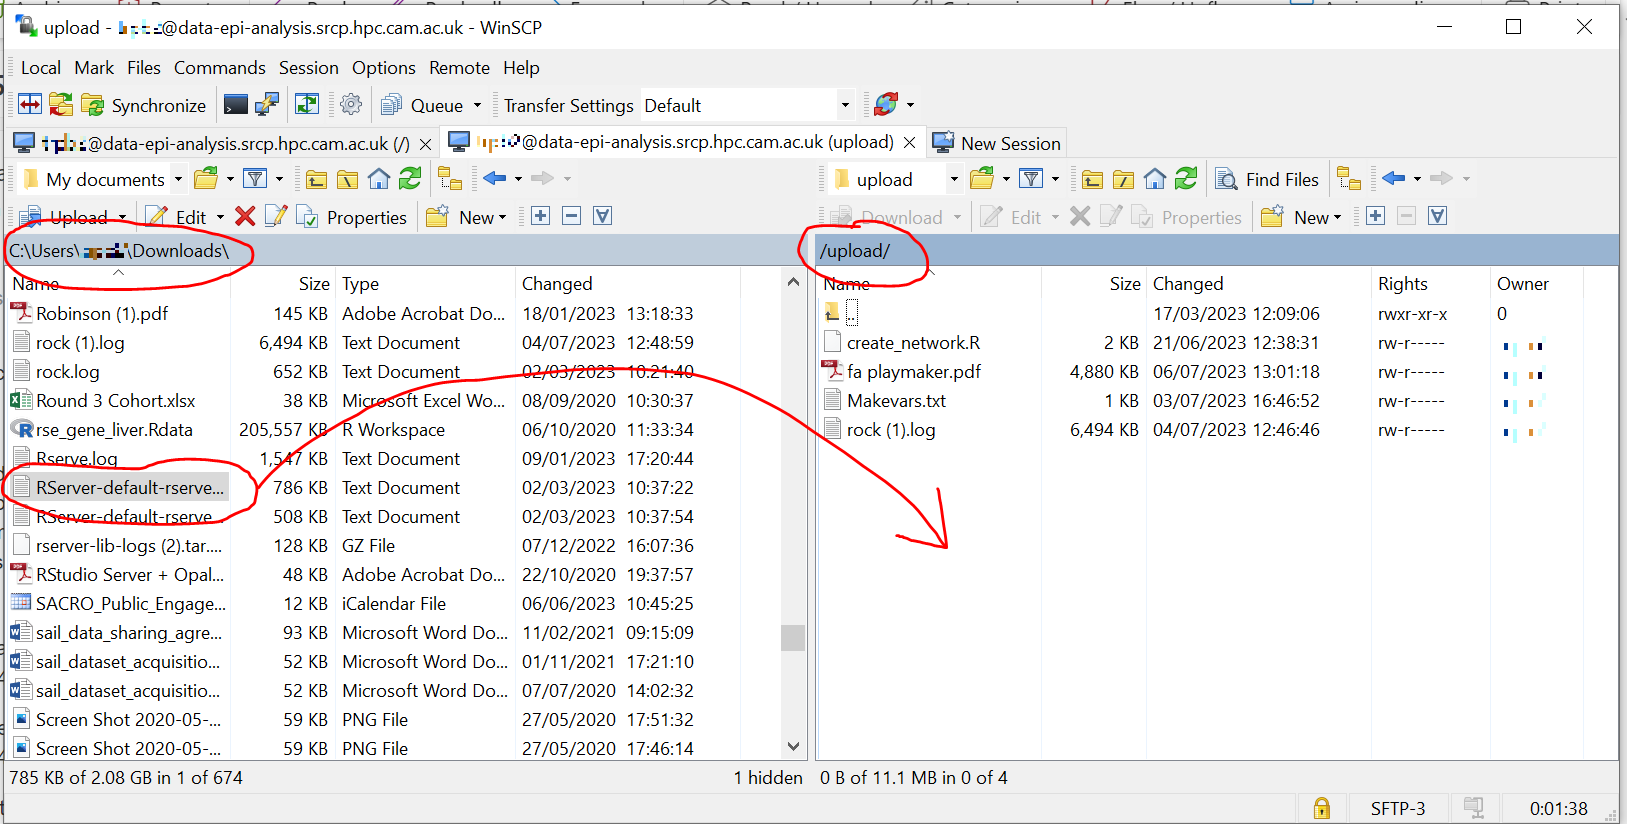
Example of uploading a data release using WinSCP
Connect to the Cambridge VPN or use a computer connected to the Cambridge network
Start WinSCP and where you will be presented with the Login dialogue. Select the session for the SRCP that you saved previously, or enter the details if you have not already done this - data-epi-analysis.srcp.hpc.cam.ac.uk on port 22 and your CRSid as the username (i.e. the same username you use to log into the SRCP web interface).
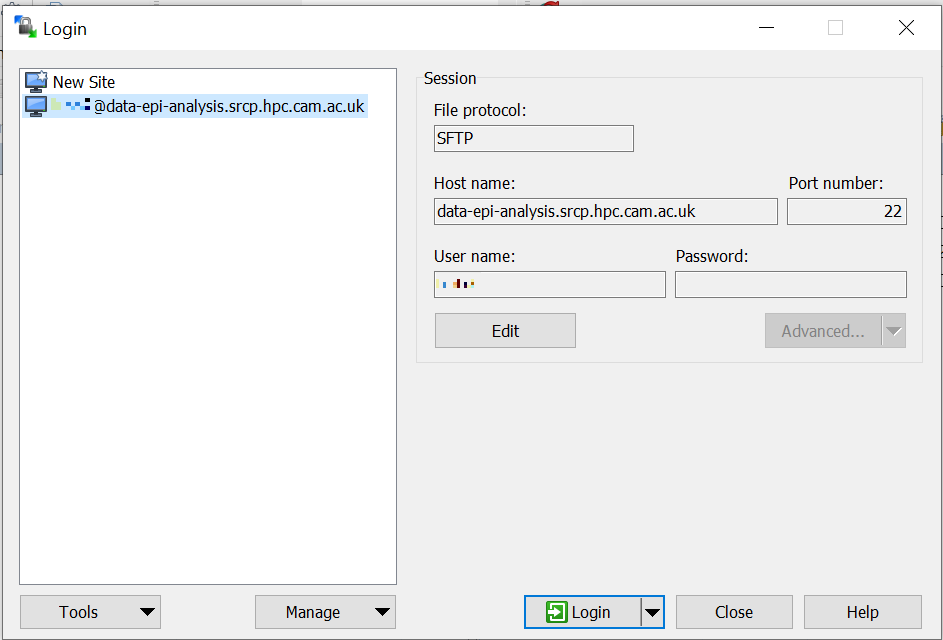
Click the Login button.
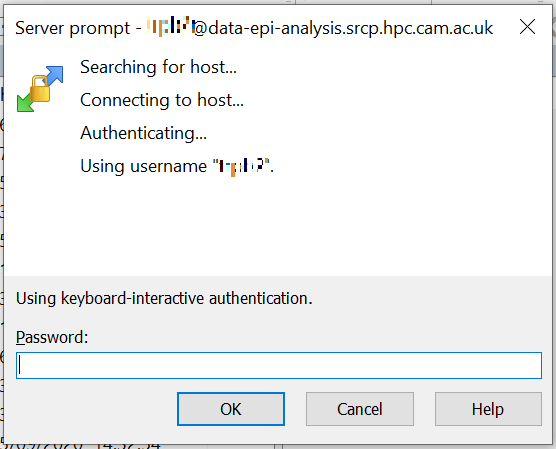
Enter your CRS/Raven password (the same as for the SRCP web interface) and then enter a TOTP from your mobile device for 2 factor authentication (the same as for the SRCP web interface)
You should now be connected. The triage upload and download folders on SRCP are shown on the right, and your local machine’s folders on the left. You can transfer files between these locations.
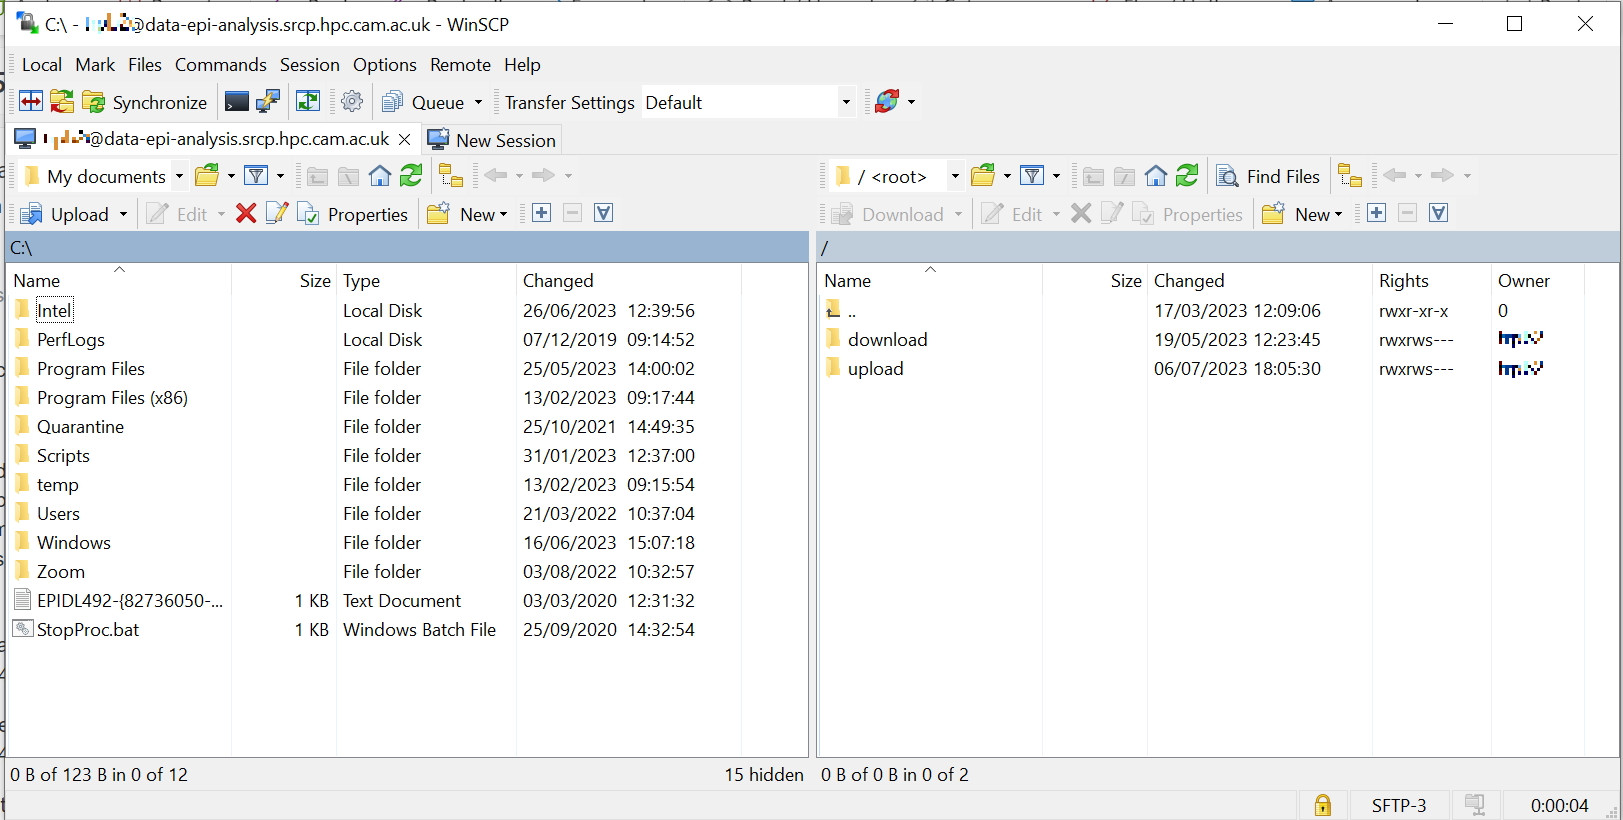
Locate the data release on your local machine (left side) that you wish to upload. Drag and drop it into the upload folder on the SRCP (right side)
Switch to a browser, log into the SRCP and start a remote desktop session, use the project ID that corresponds to the user whose data is being worked on
Copy (not move) the data from your
triage/<yourusername>/uploadfolder to the user’s projectdatasubfolder:On the command line:
$ cp /srv/data-manager/triage/<yourusername>/upload/<filename> /srv/projects/<userproject>/data
Or from the file manager application (which works in a similar way to Windows File Explorer)
If required, a
7zarchive can be unzipped:$ 7zG x myfile.7z
If the data are large and a copy is stored elsewhere, delete any copies of the data from your triage folder to save storage space.
Process for users wishing to bring files into the SRCP
Users may ask Data Managers to allow them to upload files to the SRCP. This might be to bring in extra data sets or bespoke code that they cannot download from the standard repositories available in the SRCP. If data are being brought in, checks should be made that the user has permission to use the data (if it is not from a public source, for example another study).
A summary of the process for users wishing to bring supplementary data or code into the SRCP is:
The user connects to their “upload” triage folder using SFTP and uploads the files.
The user notifies a Data Manager of the file names. These should be in the user’s “upload” triage folder - the user should have followed the steps for uploading a file via STFP
The Data Manager copies the files to their “download” triage folder on the SRCP
The Data Manager connects to the SRCP via SFTP and downloads the files to their local machine.
The Data Manager inspects the files and confirms that they contain appropriate data/code (see more details below)
On the SRCP, the Data Manager copies (not moves) the files from the user’s “upload” triage folder to the user’s project data folder and notifies the user.
The user uses the files that are now available in their project data folder (they may need to copy to their analysis folder to edit).
Tidy up
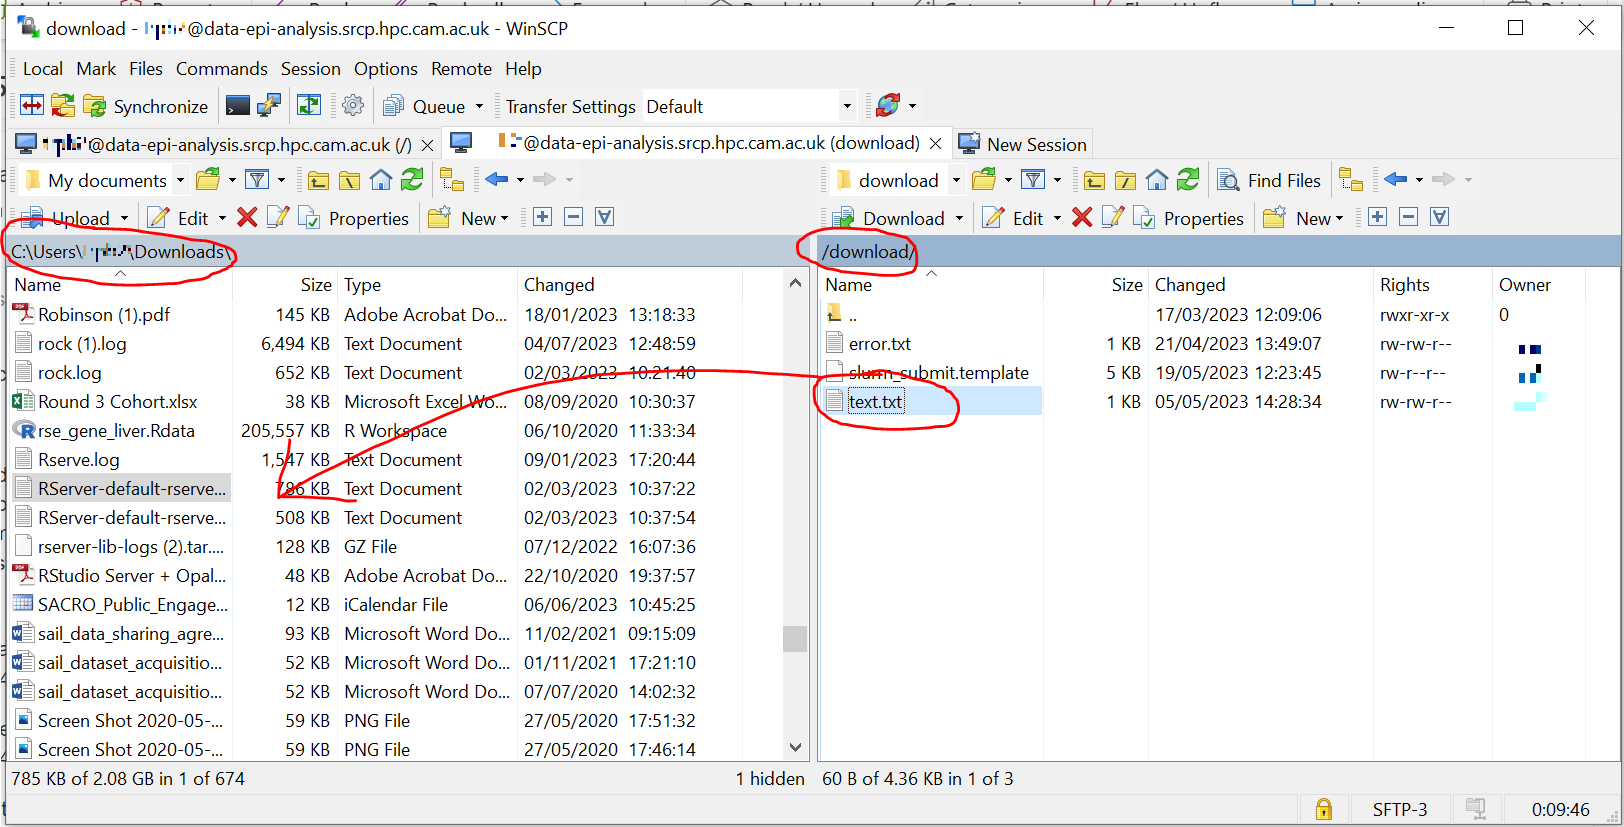
Example of enabling a user to bring files into the SRCP using WinSCP
After receiving a request to make a user’s uploaded files available, you will need to download the files yourself to check them. The initial step is to copy the files from the user’s “upload” folder to your own “download” folder. Alternatively, you can take local copies on the SRCP and examine the files there.
If downloading the files, log into the SRCP and start a remote desktop session, use the project ID that corresponds to the user whose data is being worked on
Navigate to the user’s triage folder
/srv/data-manager/triage/<username>/uploadeither on the command line or in File ManagerCopy the files from the user’s triage folder
/srv/data-manager/triage/<username>/uploadto your own download triage folder/srv/data-manager/triage/<yourusername>/downloadeither on the command line or in File Manager. OR leave the files where they are and inspect them directly on the SRCP.Start WinSCP and log in using the details saved previously. Navigate to your download folder and copy the files to a location accessible from your local machine.
Inspect the files - see details below
If the files are OK then on the SRCP, copy (not move) the files from the user’s “upload” triage folder to the user’s project data folder either on the command line or in File Manager. Notify the user that the files are ready for use.
(If the files are large then delete them from both your own and the user’s triage folder to save space? Or delete them from your local computer? Assume user has a back up on their local computer?)
Process for users wishing to take files off the SRCP
Users will ask Data Managers to allow them to download files from the SRCP. This is so that they can remove summary results for their research, not for removing data from the SRCP.
A summary of the process for users wishing to download files from SRCP is:
The user notifies a Data Manager of the file names they wish to download and their location.
The Data Manager copies the files to their “download” triage folder on SRCP OR accesses the files directly on SRCP.
The Data Manager connects to SRCP via SFTP and downloads the files to their local machine OR accesses the files directly on SRCP.
The Data Manager inspects the files and confirms that they meet the Disclosure Control Rules (more details below)
On SRCP, the Data Manager copies (not moves) the files to the user’s “download” triage folder and notifies the user. You will need to use the option
--preserve=xattrwith the$ cp, otherwise the user won’t be able to access the files (this copies the NFS permissions too). An example would be$ cp -r --preserve=xattr /srv/projects/<project>/<folder> /srv/data-manager/triage/<user>/download.The user connects to their “download” triage folder using SFTP and downloads the files
Example of enabling a user to download files from SRCP using WinSCP
After receiving a request from a user to make some of their files available for download, you will need to download the files yourself to check them. The initial step is to copy the files from the location specified by the user (e.g. the analysis subfolder in their project folder) to your own “download” folder. Alternatively, you can take local copies on SRCP and examine the files there.
If downloading the files, log into SRCP and start a remote desktop session, use the project ID that corresponds to the user whose data is being worked on
Navigate to the location specified by the user (e.g. the analysis subfolder in their project folder) either on the command line or in File Manager
Copy (not move) the files from the location specified by the user to your own download triage folder
/srv/data-manager/triage/<yourusername>/downloadeither on the command line or in File Manager. OR leave the files where they are and inspect them directly on SRCP.Start WinSCP and log in using the details saved previously. Navigate to your download folder and copy the files to a location accessible from your local machine. OR leave the files where they are and inspect them directly on SRCP.
Inspect the files - see details below
If the files are OK then on SRCP, copy (not move) the files from the the location specified by the user to the user’s “download” triage folder
/srv/data-manager/triage/<username>/downloadon the command line. To confirm which<username>is needed, you can use the University Lookup Service . You will need to use the command$ cp --preserve=xattr <source> <destination>, otherwise the user won’t be able to access the files (this copies the NFS permissions too). Notify the user that the files are ready for download.(If the files are large then delete them from both your own and the user’s triage folder to save space? Or delete them from your local computer? Confirm with the user that they have downloaded the files to their local computer?)
Output and input disclosure control
This guidance for Data Managers describes the process for reviewing files entering or leaving the SRCP.
High level steps
Outputs:
Do you understand what you are being asked to check? Ensure the request is clear and sufficiently described. If not, return to the user for clarification. Seek support from an experienced colleague if the file type or content is unfamiliar.
Do the requested outputs align with the approved research objectives? Outputs must be consistent with the project’s stated aims and approvals.
General checks
Is the volume of material reasonable and consistent with publication-ready outputs?
Do the files contain direct identifiers or obvious individual-level data?
Do the files contain hidden content or allow derivation of disclosive information (e.g. hidden worksheets, embedded objects, metadata, revision history, .rhistory, .RData, .Rproj, HTML with embedded data)?
Be alert to deliberate obfuscation (e.g. encoded identifiers, disguised data exports, unusual file formats).
What type of files are being reviewed? Determine whether the outputs are:
Standard statistical results (tables, regression coefficients, graphs)
Code
‘Omics results
Containers
Binary files (e.g. .pkl, .joblib)
Machine learning results
Machine learning models
The file type determines the detailed checks required.
Inputs:
Do you understand what you are being asked to check? Ensure the request is clear and sufficiently described. If not, return to the user for clarification. Seek support from an experienced colleague if the file type or content is unfamiliar.
Do the requested inputs align with the approved research objectives? Materials must be necessary and proportionate to the research aims.
Does the user have appropriate permission to use the material? This applies particularly to data and third-party code. Confirm:
Licensing compliance
Data sharing agreements
Ethical approval compatibility
What type of files are being reviewed?
Data
Code
Containers
Binary files (e.g. .pkl, .joblib)
The file type determines the detailed checks required.
Files to be taken out
After passing the high level check above, the following sections describe additional checks by output type.
Standard results
Standard results include tables, regression coefficients and graphs. These should be assessed using section 7 of the SACRO guide to output checking which provides detailed guidance beyond general rules such as minimum cell counts or non-derivability. The guide doesn’t actually specify a minimum cell count as this can vary between institutions. We will continue to use 10.
The SACRO tool is being investigated to assist with checking standard results.
Code
Check for embedded results in comments or notebooks.
Ensure no data objects are stored within scripts or notebook outputs.
While detailed understanding of code is not necessary, a Large Language Model (LLM) such as ChatGPT may assist in summarising or interpreting code structure.
‘Omics results
Follow the Genomics England Airlock Rules where possible
For GWAS results:
Minimum Allele Count (MAC): 20
Minimum Allele Frequency (MAF): 0.005
The Minor Allele Count (MAC) sets an absolute minimum number of observed minor alleles, ensuring that results are not driven by very small numbers of individuals and reducing small-cell disclosure risk. However, in large studies a variant may meet a MAC threshold while still being extremely rare in relative terms. Such variants can remain potentially identifying or vulnerable to inference attacks. Therefore, a minimum Minor Allele Frequency (MAF) threshold is also applied, to prevent release of results for variants that are rare in the study population even if their absolute count exceeds the MAC limit.
Some kinds of graphs and figures showing individual level data are described by Genomics England as potentially be safe for taking out. This is where the data has been categorised as non-identifying and summarised, despite being individual level, provided that minimal or no phenotypic data is included for the individuals. These are as follows at present: Circos plots, IGV screenshots, Oncoplots, graphs showing “genetic summary statistics”: stats like tumour mutational burden, mutational signatures, or similar.
Containers
The SRCP supports Apptainer containers (.sif files). The current best practice is to inspect the structure and contents of the container. To do this Apptainer needs to be installed on a VM (you only have to do this once) or you can use Apptainer on the SRCP itself. Then use the following steps:
$ apptainer inspect -d my-container.sif- look at the definition file to see the components of the container%filessection is where “data” are defined. It will describe how the container accesses folders on the host and the location of embedded data. We shell into the container by doing$ apptainer shell my-container.sifThen$ cd /locationand we can look at the actual files bundled with the container.From:section describes the base image e.g. a plain install of Ubuntu.%postsection is where packages are installed during the building of the container. For example it might tell Python to install some packages.Shell into the container to check embedded files by doing
$ apptainer shell my-container.sifAn AI tool like ChatGPT might help to process long package lists and flag anything that looks strange.
Binary files (e.g. pkl, joblib)
joblib and pkl files are used to store data but are not human-readable. Therefore if a user asks to take these types of files out of the SRCP they need to provide the environment configuration that allows the files to be opened.
The environment should be recreated on the SRCP or on a VM. SRCP is probably less effort, but is limited to conda (not Python venv which uses requirements.txt) and so an environment.yml is required:
Assuming SRCP – Create the environment
$ conda env create –f environment.ymlThe environment name is specified in the.ymlfileActivate the environment:
$ conda activate my_new_envInstall Jupyter Lab to allow you to interact with the code etc:
$ conda install jupyterlabStart Jupyter Lab.
$ jupyter labWith the user’s code as reference, load the joblib/pkl and investigate it to judge whether it can be brought in or out
Dataframes or raw data structures must not be released. Trained machine learning models are subject to the SRCP’s ML policy (see below).
Machine Learning Results
Machine learning performance metrics (e.g. AUC, accuracy, recall, specificity, precision) are generally acceptable for release, subject to standard disclosure checks.
Machine Learning Models
Trained machine learning models developed using data held on the SRCP must not be exported under the current policy unless a formal risk assessment demonstrates minimal disclosure risk.
Risks include:
Memorisation of rare records
Membership inference attacks
Model inversion
Reconstruction of training examples
Guidance in this area is evolving. Until further policy development, the default position is not to release trained models.
Files to be taken in
After passing the high-level checks above, the following sections describe additional checks by file type.
Standard data
For datasets entering the SRCP:
Confirm user permission and licensing.
Confirm compatibility with project approvals.
The objective is not disclosure control (as for outputs), but legal, ethical, and governance compliance.
Code
Security Scanning: Scan code/scripts for malware or vulnerabilities. Use a virus scanner before transfer.
Source Verification: Check that code comes from reputable repositories or collaborators.
Code Understanding: If you are unsure about the function or appropriateness of code, consider using a Large Language Model (LLM) such as ChatGPT to help interpret, summarise, or highlight potential issues in the code.
Machine Learning Models
These can be treated as Code for the purpose of bringing files in.
Containers
See the section above for getting a container running to inspect it.
SRCP’s isolation from the internet and the triage-based file transfer process reduce security risks, as containers cannot download extra content or exfiltrate data. If a container accidentally corrupts a user’s files, these can be restored from offsite backups. However, if you are very concerned about a container, these more challenging steps can be followed:
Vulnerability Scanning: Use scanners like Grype to check for known issues. note: Grype will often produce a very large list of vulnerabilities, many of which may not be relevant in the SRCP’s isolated environment. For example, Grype highlights issues that would be critical for an internet-facing web application, but are low risk within the SRCP. Focus your attention on vulnerabilities that could realistically impact the security or functionality of the platform.
Virus Scanning: Optionally run a virus scanner before import.
Security Context: Note that SRCP uses Apptainer and Podman (not Docker). Containers will run with restricted user privileges on the SRCP, reducing risk relative to Docker based systems.
Behaviour Monitoring: Consider using Falco to monitor for suspicious activity when running containers. However, this is quite a laborious process as you will need to run it on a virtual machine running Docker, and then start the container to see what happens (see the “Try Falco” option on the website)
Binary files (e.g. pkl, joblib)
See the section above for getting an environment set up to open the file
The primary concern for imports is verifying that:
The file does not contain unauthorised datasets.
The file does not introduce malicious code.
End of life for projects
In this section we will detail what to do at the end of a project. To some extent we will have captured results as they are taken off the SRCP. The code can be given to the user. There are questions about what to do with large datasets that are hard to regenerate. In some cases, if they do not contain personal information they can be removed and given to the user to look after.
Windows SRCP
We are not the platform manager for the Windows SRCP as it is shared with the Clinical School.
Setting up a Windows SRCP project
To request a new project, this form needs to be completed. The following responses are suggested for standard EPIC Norfolk projects but could be changed if needed:
Section 1 – SRCP Platform. Select “New project” and “Windows”. The platform id is 6qdw8f4p9t5
Section 5 – Create a Project. The project name is will be the folder name, the suggested format is
year_month_initials_ENDRnumberwhere initials are for the person doing the research. The description can be taken from the ENDR form.Section 6 – Project Managers. Select “No”. Although there are only 2 boxes, enter all the data managers here
Section 7 – Software Requirements. Enter “RStudio, Python, RDS Farm”.
Section 10. Select “Yes”.
Section 11 – Data Compliance. Enter “N/A - uses data from the existing EPIC Norfolk study.”.
Section 12 – Data Provider Details. Enter “N/A” for all sections.
You should then receive a confirmation email titled SRCP Resource Request. Wait a few more minutes, and then you should get a new ticket from RCS support with a title like HPCSSUP-123456 SRCP Resource Request. Reply to this email with a copy of the data request form (required by Victoria Hollamby who is the Clinical School Research Governance Advisor).
After the project is set up
Create the data and analysis folders.
Set the permissions (https://docs.hpc.cam.ac.uk/srcp/swd/faq.html#giving-access-to-project-users). Note the pain of having to search for uis-project-<projectid> in a text box that is hard to find (right click properties->security->Add->(type search term) ->Check
Read access for data and Modify for analysis
Copy the data over
Probably request RDS farm access (TBC whether including this request in Section 7 of the project request form will work)
Instructions for accessing RStudio, Stata etc
These instructions are for RStudio but the process is similar for Stata.
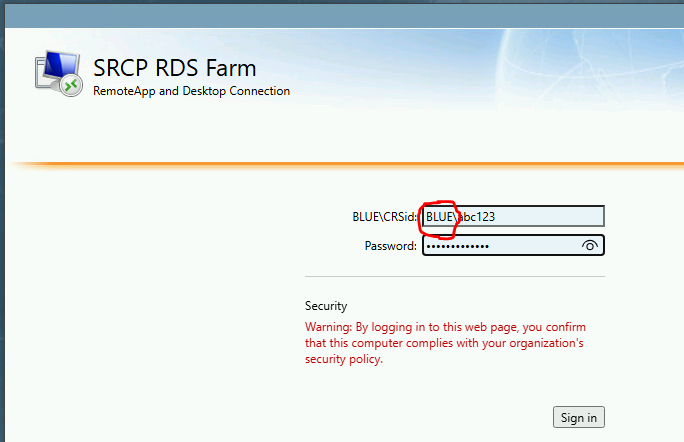
IMPORTANT Be sure to save you work in X:/<your project folder>/secure-platform/analysis and nowhere else, or it will be lost when the session closes.
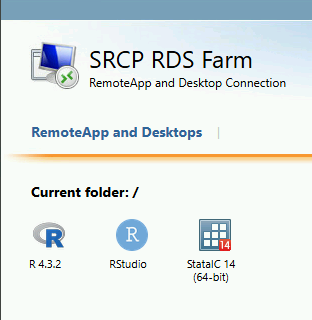
On the start menu, locate RDS Farm and click it:

A browser window should open. Enter your credentials, being sure to include BLUE\ in front of your CRSid, and press sign in:
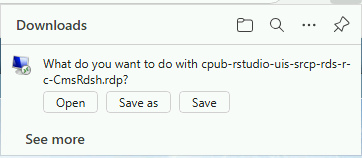
You should now see these short cuts. Click on RStudio:
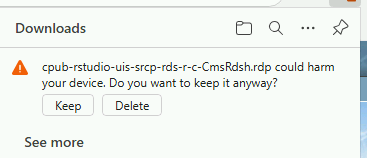
A download should appear. Click Open:
Click Keep:
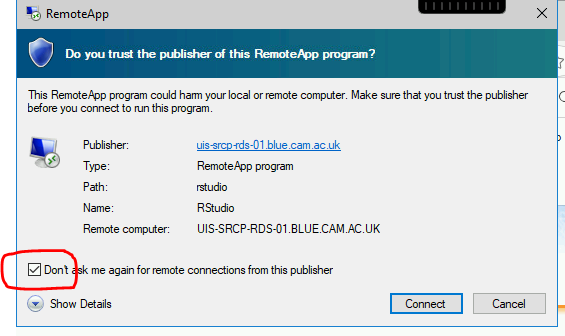
Choose “Don’t ask me again….” and click Connect:
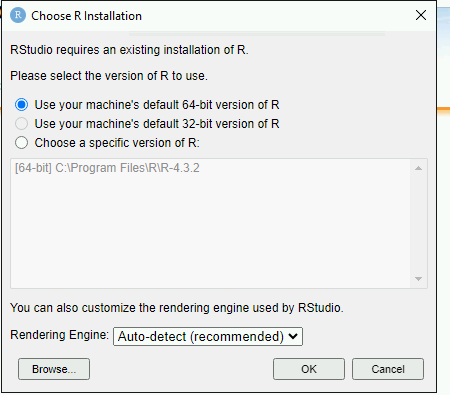
After a while, RStudio should start.
Accept the selected version of R to use:
Packages cannot be installed by users as the SRCP is isolated from the internet. Email srcp@hpc.cam.ac.uk with the subject “Windows SRCP - R Package request” to have packages installed OR TBC open a request to bring in a packages as a zip file via the airlock
Import and Export with Windows SRCP
1. Go to: https://transfer.srcp.hpc.cam.ac.uk/ 2. To log in, use your CRSid as the username along with the associated password. Unfortunately this service uses a separate one time passcode system, which you need to set up in the usual way by scanning the QR code with your phone. It is then listed as “Cerberus” in your OTP app for future reference. 3. Once logged in, navigate to the Export or Import folder as appropriate. Then go into the folder for your project, and then the shared folder within that. 4. For Export, select the files required, right click and choose download. 5. For Import, use the green Add Files or Add Folder buttons at the bottom of the screen
Email templates
After completing VW process - apply for SRCP account
This template has actually been automated. In Jira:
Go into the Completed Request New Project on SRCP subtask
Click the lightning bolt
Click “Request account email button”
Check the audit log to see that the email went
A service desk email will open a new ticket. Unfortunately it doesn’t seem to add the person as the reporter….
Hi <<name>>,
Thank you for your application to access EPIC Norfolk data. The next step is to apply for access to the Secure Research Computing Platform (SRCP) where you will be able to work with the data. Please complete this form:
https://www.hpc.cam.ac.uk/srcp-request-user-access
You will be asked to log in with Raven, this requires your CRSid (<<CRSid>>) and associated password.
On the form, enter the following
Requested Role = Project User
Project ID = <<project-id>> (NOTE - this project ID is also needed to start sessions on SRCP so please retain it)
If you are using a computer connected to the Cambridge University Network then this next step can be skipped. If you are accessing SRCP from an external computer, you can follow these instructions to prepare a connection to the Cambridge VPN while you wait for your SRCP account:
https://help.uis.cam.ac.uk/service/network-services/remote-access/uis-vpn
Please do get in touch if you need assistance with setting up the VPN.
Best wishes <<sender-name>>
SRCP account set up - next steps
The SRCP Data Managers will receive an email from the SRCP support team informing them that an account has been set up for a user. This email is sent to the user’s “@cam.ac.uk” address so they probably won’t know that their account is ready. Therefore we can forward on the email with the following additional information:
Hi <<name>>,
Your SRCP account is ready. There is a brief introductory video and overview of the SRCP on the documentation homepage: https://srcp-docs.readthedocs.io/ along with more detailed documentation.
If you feel you would like a demonstration of the basic functionality of the SRCP (logging in, starting a remote desktop, running applications etc) we can set up a meeting with you. Otherwise, to use the SRCP you will need to either use a computer connected to the Cambridge University Network, or the Cambridge University VPN. Instructions for connecting to the VPN are here:
https://help.uis.cam.ac.uk/service/network-services/remote-access/uis-vpn
Then you can proceed with the “Logging in for the first time section” in the documentation:
https://srcp-docs.readthedocs.io/en/latest/00-Logging-in-for-the-First-Time.html
The following details are needed:
CRSid = <<CRSid>>
Project identifier = <<project-id>>
Project folder name = <<project-folder-name>>
Best wishes <<sender-name>>
Work in progress
Using the command line
Once the remote desktop session is running, the following steps can be followed from a terminal:
Download
Navigate to the folder specified by the user:
$ cd /<foldername>Look in the folder:
$ ls -laCopy the file requested by the user to your own triage download folder:
$ cp <filename> /srv/data-manager/triage/<yourusername>/downloadConnect via SFTP and download the file
Check the file for individual level data (i.e. the data should be results only a more rigorous checklist may be developed)
If the file looks OK, copy the file to the user’s triage download location
$ cp <filename> /srv/data-manager/triage/<username>/downloadEither notify the user that the file was copied as requested to their triage download folder and is available via SFTP, or explain what needs to be changed for the file to be acceptable for download.
Upload
Navigate to the user’s triage folder:
$ cd /srv/data-manager/triage/<username>/uploadwhere<username>is the CRSid of the userLook in the folder:
$ ls -laCopy the file requested by the user to your own triage download folder
Connect via SFTP and download the file to your local computer
Check the file for what - malicious code? data that they shouldn’t have - how do we know?
If the file looks OK, copy the file requested by the user to the location required (for example, the user’s project folder):
$ cp /srv/data-manager/triage/<username>/upload/<filename> /srv/projects/<projectname>where<projectname>is the user’s projectEither notify the user that the file was copied and tell them the location, or explain what needs to be changed for the file to be acceptable for upload.
Using file manager
Once the remote desktop session is running, the following steps can be followed using the file manager application:
Download
Navigate to the folder specified by the user
Look in the folder
Copy the file requested by the user to your own triage download folder (
/srv/data-manager/triage/<yourusername>/download)Connect via SFTP and download the file
Check the file for individual level data (i.e. the data should be results only a more rigorous checklist may be developed)
If the file looks OK, copy the file to the user’s triage download location (
/srv/data-manager/triage/<username>/downloadwhere<username>is the CRSid of the user)Either notify the user that the file was copied as requested to their triage download folder and is available via SFTP, or explain what needs to be changed for the file to be acceptable for download.
Upload
1. Navigate to the user’s triage folder: n``/srv/data-manager/triage/<username>/upload`` where <username> is nthe CRSid of the user
2. Look in the folder
3. Copy the file requested by the user to your own triage download folder
4. Connect via SFTP and download the file to your local computer
5. Check the file for what - malicious code? data that they shouldn’t have - how do we know?
6. If the file looks OK, copy the file requested by the user to the location required (for example, the user’s project folder) /srv/projects/<projectname> where <projectname> is the user’s project
7. Either notify the user that the file was copied and tell them the location, or explain what needs to be changed for the file to be acceptable for upload.
Notes on project permissions
The platform manager group can rwx on folders and files created in project folders by any other platform - controlled by NFS ACL. The children of the project folder inherit the permissions.
When the platform manager creates the data/analysis folders, they apply ACL permissions to these which are inherited by the items created in these folders.
Draft considerations for whitelisting sites
Ideally users should not have access to any external locations outside of the SRCP to avoid the risk of data being taken out (either on purpose or accidentally) without it first undergoing checks to ensure it doesn’t container personal information. Without these restrictions users could easily remove files, for example by uploading them to Google Drive. Other sites that could have a legitimate use can allow data to leave, for example Github. There is a route for bringing files in and out of the SRCP where they are checked by a Data Manager.
However, a balance may be struck where access to certain locations may reduce the amount of checking (and hence increase speed of ingress) while not significantly increase the risk of data being removed from the SRCP without being checked. In these risk-assessed cases, we refer to the location being white-listed. A specific example is the CRAN (Comprehensive R Archive Network) hosted by Bristol University. The CRAN is a network of ftp and web servers around the world that store identical, up-to-date, versions of code and documentation for R. Access to the CRAN allows users to install a vast range of statistical packages that are frequently used in science. Therefore it is convenient to allow users to install R packages from the CRAN themselves, rather than having to wait for a Data Manager to import a package archive and having a more complicated installation. CRAN sites don’t host the mechanism for submitting new packages, thus there is no route to be able to push data to the CRAN. New packages are created by submitting code for peer review, which also reduces the chances of malicious content appearing on the CRAN.
Conversely, pypi.org, which hosts Python packages that can be downloaded with Pip, allows users to upload new packages. Therefore even though this location might be useful for users wanting to download packages themselves, it is blocked to avoid data being taken out in packages. Often Python packages can be obtained via Conda, which does provide the ability to upload.
If users have complex software requirements but a location can’t be whitelisted, an option is for them to build their environment in a container outside of the SRCP. For example, they may require a package that has a large number of dependencies, making it impractial for a Data Manager to bring them in manually. This gives the flexibility to install whatever is required, before the container is scanned and brought into the SRCP.
Note that the whitelisting is done by IP address rather than domain name. Care is needed because if two domains point to the same IP address, if one domain is whitelisted, the IP address can be accessed (this was the case with pypi.org and pythonhosted.org).
A set of considerations for whether a location should be whitelisted might include:
How many users need access to the location? If it is a small number for a finite project, access could be given for the duration of the project and then removed. Equally if only a few users require it, a manual approach might be possible.
Can you find a way to upload data to the location? For example if you can submit your own package. Note that often APIs offer an upload method, but this actual returns a separate cloud storage location (e.g. on AWS) where the file should be uploaded to. Thus since AWS blocked, an upload is not actually possible.
Could the environment be built in a container and brought into SRCP after scanning?
How trustworthy is the location? If it hosts packages, do they undergo peer review which would give some reassurance that malicious code might not be hidden in a package?